How to Quilt Photorealisitc Applique

Published: Wed, 07/12/17

Hi ,

Are you looking for a super speedy way to add curves to your quilts? Or have you always wanted to make a photorealistic, nature-themed quilt?

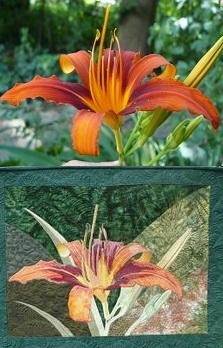
One of my favorite ways to create quick flower quilts is to applique with the technique called No Sewing Until You Quilt It. It's a turned edge applique technique created by my friend Ann Holmes that allows you to easily build complicated quilts over a layer of French Fuse interfacing.

The beautiful lifelike flower was quilted by Judy Pearce from Ontario, Canada, using Ann Holmes' technique.

In this Combo Kit you will receive:

  • No Sewing Until You Quilt It Book -  This book is the ultimate visual guide to this wonderful applique technique. Follow along through 7 projects as Ann teaches you how to use the technique in a variety of ways. Print out full size patterns for her quilt designs from the computer CD included in the back of the book.

  • 1 yard of French French interfacing - Because this interfacing is so critical to the No Sew technique, it makes sense to get it at the same time as the book. This way you can get started right away trying out this cool new way to construct a quilt.

  • When you purchase this combo kit you will also receive a pattern for a beautiful Sunflower Quilt created by Leah Day for FREE. This wall hanging was designed specifically for No Sewing Until You Quilt It for constructing the quilt top piece-by-piece. This free Sunflower Quilt Pattern will arrive as a digital download after placing your order.
For this week you can pick up No Sewing until You Quilt It, 1 yard of French Fuse interfacing, and the bonus sunflower pattern for 24.95, five dollars off the usual price of $29.95.

Quilting the Triple Tulip Block
Last week we learned how to piece the Triple Tulip Flower Block and this week I'm quilting it with a combination of feathers, Pebbling, and a ruler guided grid design.


Quilting this block is a little time consuming, but it's absolutely worth it because of the beautiful texture and designs we're adding to the block. Take your time with each section and follow the video linked below to learn how to move through the block with the least number of thread breaks.

Longarming on the Line
I had a fun adventure on the Grace Qnique longarm this week. I pulled out the IKEA pear table runner and began quilting inside the pear shapes.

The design in this area was so busy I just quilted on the marked lines.


Click Here to find all the videos I've shared on the Grace Qnique machine so far. I really love this little longarm and enjoy sharing a new tutorial on using this machine each week.

On this table runner, that was one crazy print inside that pear! I just picked a line to get started and began quilting through the area. The nice thing is the lines were 1/8-inch wide so I could quilt pretty sloppy and it still looked great.
Free Motion Design Cotton Candy
A few weeks ago I started playing around with a simple Clouds quilting design and then I couldn't seem to stop playing with the design. 

It's fun to quilt the fluffy shapes and add a light, pretty design to our quilts.

Here's a simple variation I'm calling Cotton Candy.

Cotton Candy is a very simple design and a great way to practice quilting Clouds. You begin with the simple clouds shape, then travel stitch and echo quilt around it multiple times to add a ripply texture to your quilts.


That's it for this week! If you like the looks of Cotton Candy and similar curvy designs, please do check out my good friend Ann Holmes' book No Sewing until You Quilt It.

Let's go quilt,

Leah Day