Bind Your Quilt by Machine

Published: Wed, 02/21/18

Hello my quilting friend! It's so nice to be writing to you on this gray, rainy morning in North Carolina because I have so many bright, pretty things to show you.

Have you been quilting a lot this month, ? I have been piecing and quilting up a storm because it's so cozy to curl up at my sewing machine, turn on a good podcast, and stitch the day away.

I have so many things things to share with you today including two podcast episodes, a sneak peek on this month's Quilty Box project, and news about the quilting novel I've been writing.

Yes, you read that right - I've been working on a novel called Mally the Maker about a little girl and her adventure with a quilt and the search for her missing Grandma. 

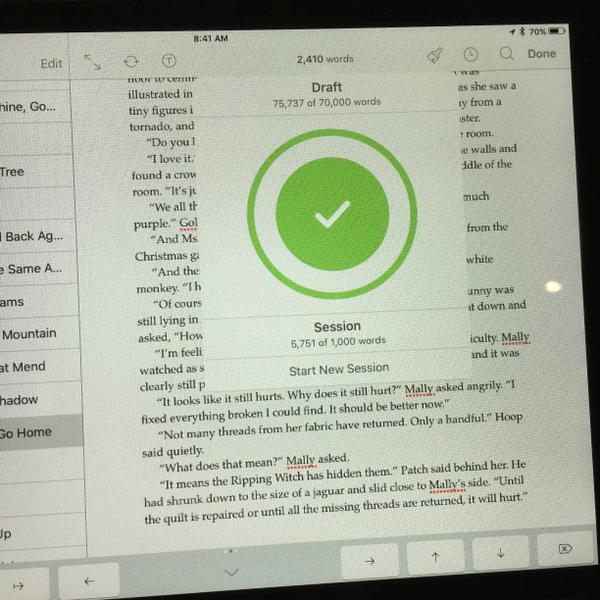
I've been working on this book for several months now and I'm thrilled to say it's nearly finished. See that great big green check mark in the photo above? That happened when I reached my word count goal of 70,000 words!

Reaching this goal has been a huge milestone for me as a writer and I can't wait to share this story with you. I'm just wrapping up the final scene today and then Josh and I will edit the book together and hope to have it ready for you by May this year. It should be the perfect novel to enjoy by the pool or when you're traveling on your own quilting adventures this summer.
Quilt Binding Getting You in a Bind?
Quilt binding is usually the "uggh" part of quilting. It's the step many quilters forget about and most beginning quilters aren't even aware of until they reach this stage of the process.

This week I've put together a three-part series that breaks down the entire binding process, hopefully making it less painful for you. Even better, this method of binding is done entirely on the machine with only a tiny bit of hand stitching in the corners.


With this binding series, we're officially finished with our first quilt for the Machine Quilting Party this year! The Rainbow Log Cabin was such a beautiful quilt to create together and I'm so happy to see all the different variations you've made.

I do hope you've enjoyed this quilting project and you've learned a lot about walking foot quilting. Remember you can always find this quilt pattern in the book Explore Walking Foot Quilting with Leah Day.

Click Here to find all the videos we've shared for the Rainbow Log Cabin Quilt.
Master Zigzag Lines with Your Walking Foot
We've finished Rainbow Log Cabin, but we're still going strong on the Marvelous Mosaic Quilt. Every Friday I share a new walking foot quilting design stitched out in a big square. Once we quilt all the squares together, we'll pick the best 20 to make our quilt.

This week's design was Zigzag Lines and hopefully this feel easy for you because we're getting back to straight line quilting. Click Here to find the quilting tutorial.

The one tricky thing about this design is the direction changes. It's really helpful to have some horizontal lines marked on your quilt to mark where the lines are changing direction so you don't have to guess and stop and rotate your quilt a lot.

I mark my lines with a ceramic marking pencil you can find here. I love this pencil because it shows up great on medium to dark fabrics, but brushes off the fabric easily after you quilt over it.

I got a lot of questions about using Zigzag design in a big quilt. The key is to always quilt from the center to the outer edges. If you quilt from the center of the quilt, you'll only have 1/2 of the quilt in the arm of your machine at a time.

With Zigzag Lines, it also helps to minimize the direction changes. You don't have to make super deep ziggies in order for the design to show up. Just rotate your quilt a little bit so it doesn't feel quite so awkward as you quilt this design.

What's the next design you can be looking forward to? Curving lines! Come learn how to quilt this design with me on Friday.
New Obsession: Tumbling Blocks
This month's Quilty Box has arrived and I've had a blast slicing into the pretty Kona Cotton Solids with the special cutting ruler they included in the box.

Once I realized I could easily cut 60 degree diamonds and triangles, I was off slicing and dicing fabric to create my first Tumbling Blocks Quilt. I've wanted to make one of these for years, but always hesitated because they look really hard.

Be looking forward to a new tutorial and mini quilt pattern for the Tumbling Blocks Sunrise quilt coming out next Monday.

Catch Up with Hello My Quilting Friends
I shared last week's podcast a bit late and this week's podcast a bit early so you get two in one week!

Episode 45 - Whole 30 Diet with Camille Gray - Meet my sister Camille and how she transformed her body less than a year after having her second baby. She inspired me to clean up my diet and finally get control over my sugar addiction.

Episode 46 - No Sewing Until You Quilt It with Ann Holmes - Ann was one of the very first quilters I met when I began quilting in 2005. During a simple Round Robin quilting demonstration, she shared an applique technique that I still use today. She developed this No Sew applique technique so she could build quilts similar to how she builds stained glass windows and not take a single stitch before the quilt is basted and ready to quilt.
If you'd like to learn more about Ann's No Sew technique, please check out her book No Sewing Until You Quilt It.

We include a 1 yard pack of French Fuse, the stabilizer you need for this applique so you can get started immediately. I've used this technique to create quilts in all sizes from simple wall hangings, to the massive Dream Goddess wall hanging I hope to finish this month.


We also include a free Sunflower quilt pattern you can download and create as well. I would love to see what you do with this pattern, .

Let's go quilt,

Leah Day